Snapshot of non-root volume in AWS
How to create a replica for external volume in AWS
Welcome to my DevOps blog! My name is PAWAN JD BHAGAT, and I am a passionate DevOps Engineer with 6+ years of experience in the field. I created this blog to share my knowledge, experience, and insights on all things related to DevOps.
In this blog, you'll find a variety of content related to DevOps practices, tools, methodologies, and techniques. I'll cover everything from continuous integration and delivery, cloud computing, automation, and infrastructure as code, to monitoring and logging, security, and more. Whether you're a beginner or an experienced DevOps professional, you'll find valuable information and resources here.
I believe that DevOps is not just a set of practices or tools, but a mindset and culture that fosters collaboration, communication, and continuous improvement. Through my blog, I aim to promote this mindset and help organizations and individuals to adopt and implement DevOps practices in their work.
I encourage you to join the DevOps community and engage with me and other readers through comments and discussions. Let's share our experiences, learn from each other, and contribute to the growth of the DevOps community.
Thank you for visiting my blog, and I hope you find it useful and informative.
This blog will show us how to create a snapshot or replica (duplicate copy) of non-root volume.
What is non-root volume? : - A non-root volume is like an external volume/hard disk which contains data like documents, audio files, video files, Software files, etc.
Difference between root volume and non-root Volume.
root Volume | non-root volume |
A root volume refers to the default volume attached to an EC2 instance when it is launched. | A non-root volume refers to any additional volume that can be attached to an EC2 instance. |
This volume contains the operating system and other essential files necessary for the instance to function properly. | These volumes can be used to store data, such as user files, logs, and databases. |
It is also where applications and other files are installed by default. | The non-root volumes can be attached and detached from an EC2 instance at any time without affecting the root volume. |
The root volume is created automatically when an EC2 instance is launched. | The non-root volumes must be manually created and attached. |
The root volume cannot be deleted until we terminate the instance. | The non-root volumes can be deleted at any time. |
Snapshots of the root volume cannot be deleted unless the instance itself is terminated. | Snapshots of non-root volumes can be deleted independently of the instance. |
Overall, understanding the differences between root and non-root volumes is essential for properly managing your EC2 instances and data storage in AWS.
In a previous blog, we saw how to create the snapshot for a root volume, for more information please go through the link below.
https://hashnode.com/post/clfwd99dv00030al2c1w40siv
Why did we require a snapshot of non-root volume?
Data Protection: - Taking snapshots of non-root volumes helps to protect your data in case of accidental deletion, data corruption, or system failures. You can use this snapshot to restore your data to the previous state.
Disaster Recovery: - Snapshots can also be used for disaster recovery purposes. If your data center goes down or your server fails, you can restore your data from the snapshot to a new volume in a different availability zone or region.
Testing and development: Snapshots can also be used for testing and development purposes. You can use them to create new volumes with a copy of your data, which can be used to test software changes or perform other experiments without affecting the production environment.
Cost savings: By taking snapshots of non-root volumes, you can save costs on storage. Rather than keeping all data on an active volume, you can take a snapshot of it and store it in Amazon S3, which is a cheaper storage option.
In summary, taking snapshots of non-root volumes is important for data protection, disaster recovery, testing and development, and cost savings.
How will we take a snapshot of non-root volume?
- First, we have to create an EC2 instance with a non-root volume
Click on below blog link for more information on how to create a Linux EC2 instance
https://hashnode.com/post/cleipnprn000n09l02dvp28xe
Steps: -
a) Launch EC2 instance.
b) Give a name to the Instance.
c) Select the AMI (Amazon Linux - Free Tier eligible).
d) Select the instance type (which comes under Free Tier eligible).
e) Create a key pair (If you have already selected the existing key).
f) Create a Security group or choose an existing security group if you have one.
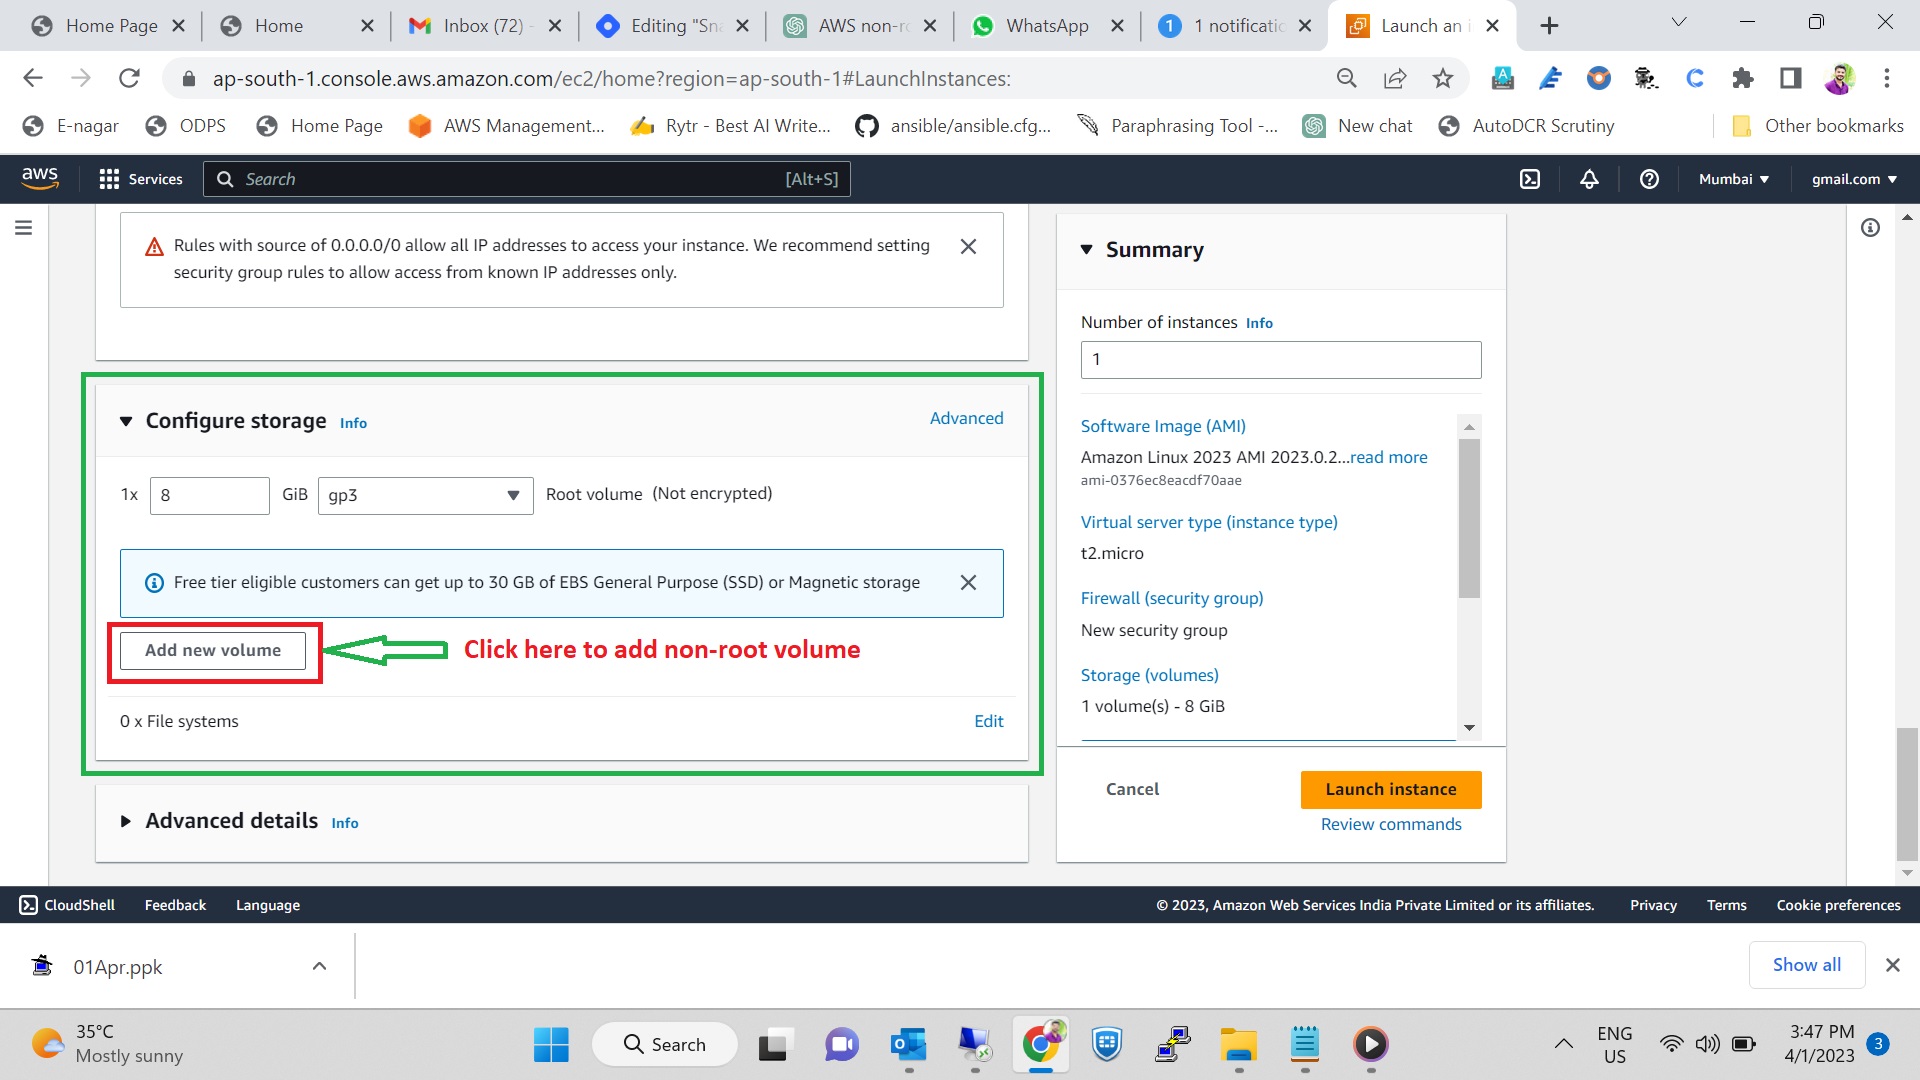
Once all the above steps are done now, we have to add a non-root volume
g) Add non-root volume in Configure Storage
After above

Once, the volume is created click on Advance

Note:- This option Delete on termination is enabled with root volume but in case of non-root volume by default it disables.
Why is this important to know?
If the delete on termination option is enabled then the volume is automatically deleted after the instance is terminated.
And if the option is disabled then the volume is not deleted automatically when we terminate the instance. we have to delete it manually
If we are doing practice then it's a good practice to always enable this option, if we forget to delete the volume also.
Once. everything is done, then launch the instance

Verify Instance and non-root volume
Steps: -
a) Go to the EC2 dashboard.
b) Click on instances (running).
c) Click on the instance.
d) Click on storage.

e) Now, Go to Volumes under Elastic Block Store
and follow the steps which are in below screenshot

How to know which is root volume and which is non-root volume?
With Snapshot: - In the above screenshot it shows that one volume has a snapshot and another has not.
With Root volume, a snapshot is created by default.
In non-root volume, a snapshot is not created by default.
This is the way we can rectify which is the root volume and which is the non-root volume
How to create a snapshot of non-root volume?
Under volume select the non-root volume and follow the steps given in the below screenshot.

After clicking on create a snapshot follow the below steps

After that Click on create a snapshot
How to verify the non-root volume snapshot?
Go to Services
Then click on Elastic block store
click on snapshot

Once the snapshot is created of non-root volume
Our scenario is like that
As per the previous blog https://hashnode.com/post/clfwd99dv00030al2c1w40siv
We have to share this non-root volume with the Singapore region and we have to launch an EC2 instance with the same non-root volume in the Singapore region.
The above snapshot we created in the Mumbai region.
Now we have to copy this snapshot from the Mumbai region to the Singapore region.
How do we copy snapshots to another region?
Steps: -
Select Mumbai region.
Select Services.
In Elastic Block Store Click on Snapshot.
Select the snapshot,
Follow below image

Click on Action
Click on Copy Image

Give the description
choose the Destination region (ap-southeast-1 for Singapore region)

- Click on Copy instance.
Verify on Singapore Region
Select Mumbai Region.
Go to services.
In Elastic Block Store Click on Snapshot.
Inside the snapshot select the snapshot.
Go to the Action.
Create Volume from the snapshot.

Here we have to create the non-root volume with help of snapshot which is received from Mumbai region.
Select the volume type
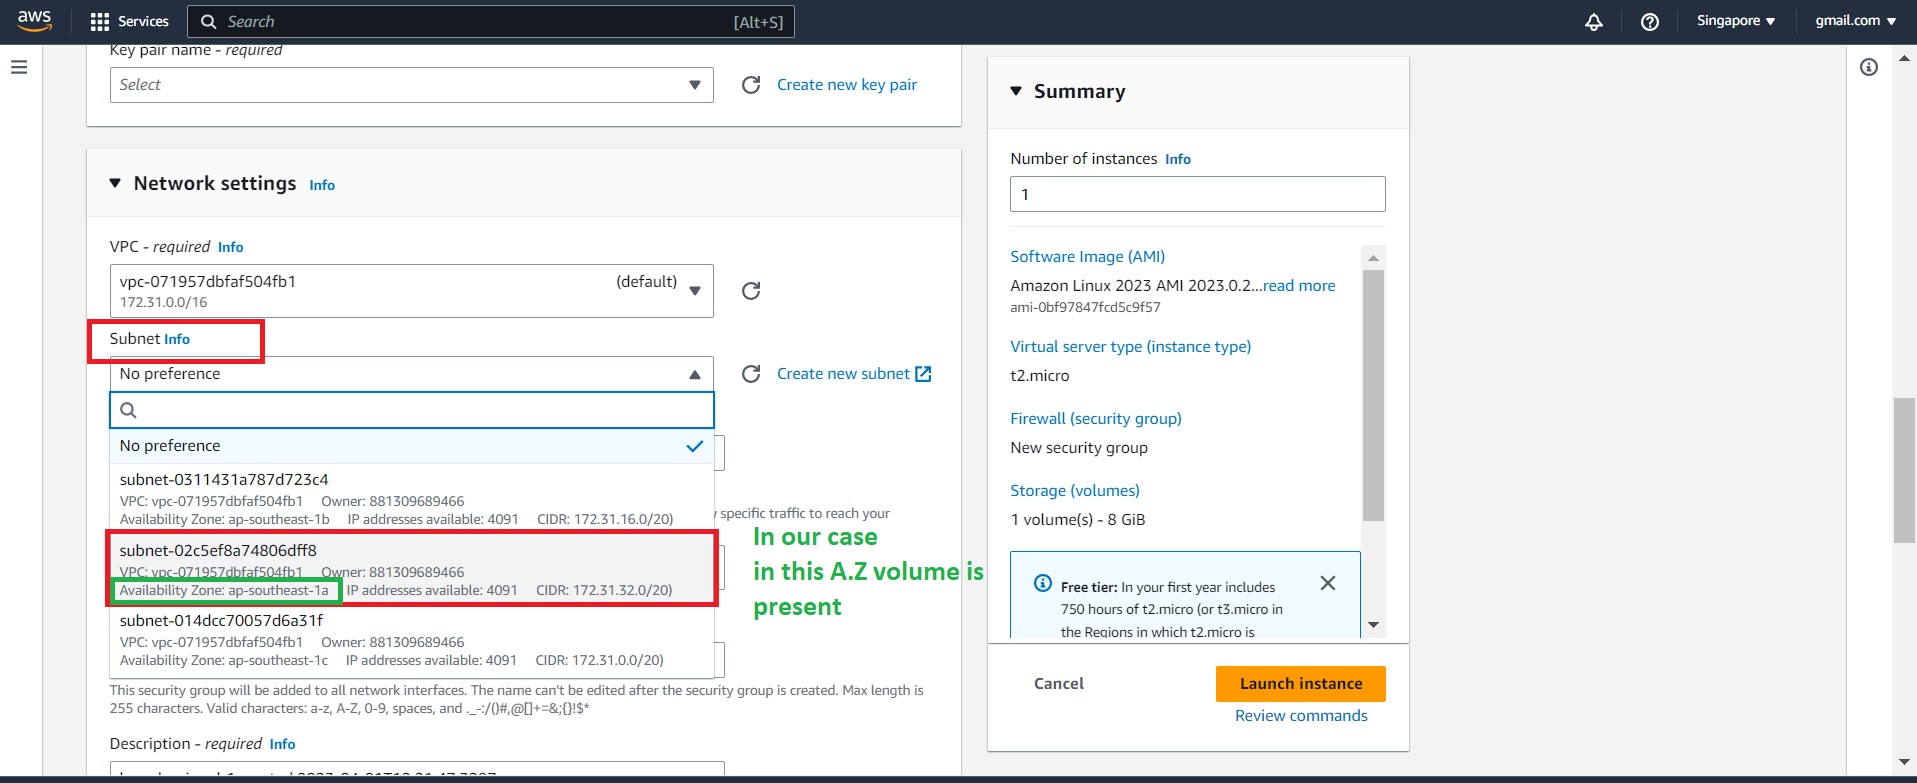
Select the availability zone
Note:- Volume and instance should be in the same availability zone.
- Give a tag name and click on Create Volume.
Verify Volume which is created using a snapshot
Go to services.
Under Elastic Block Store click on Volume.

Once everything is done Now it's time to create the EC2 instance.
Steps: -
a) Launch EC2 instance.
b) Give a name to the Instance.
c) Select the AMI (Amazon Linux - Free Tier eligible).
d) Select the instance type (which comes under Free Tier eligible).
e) Create a key pair (If you have already selected the existing key).
f) Create a Security group or choose an existing security group if you have one.
Note Here: - In Network Setting Select the appropriate subnet.
Select the same availability zone where non-root volume is present
g) Launch Instance
Once, the instance is launched successfully and we have to attach volumes to this instance
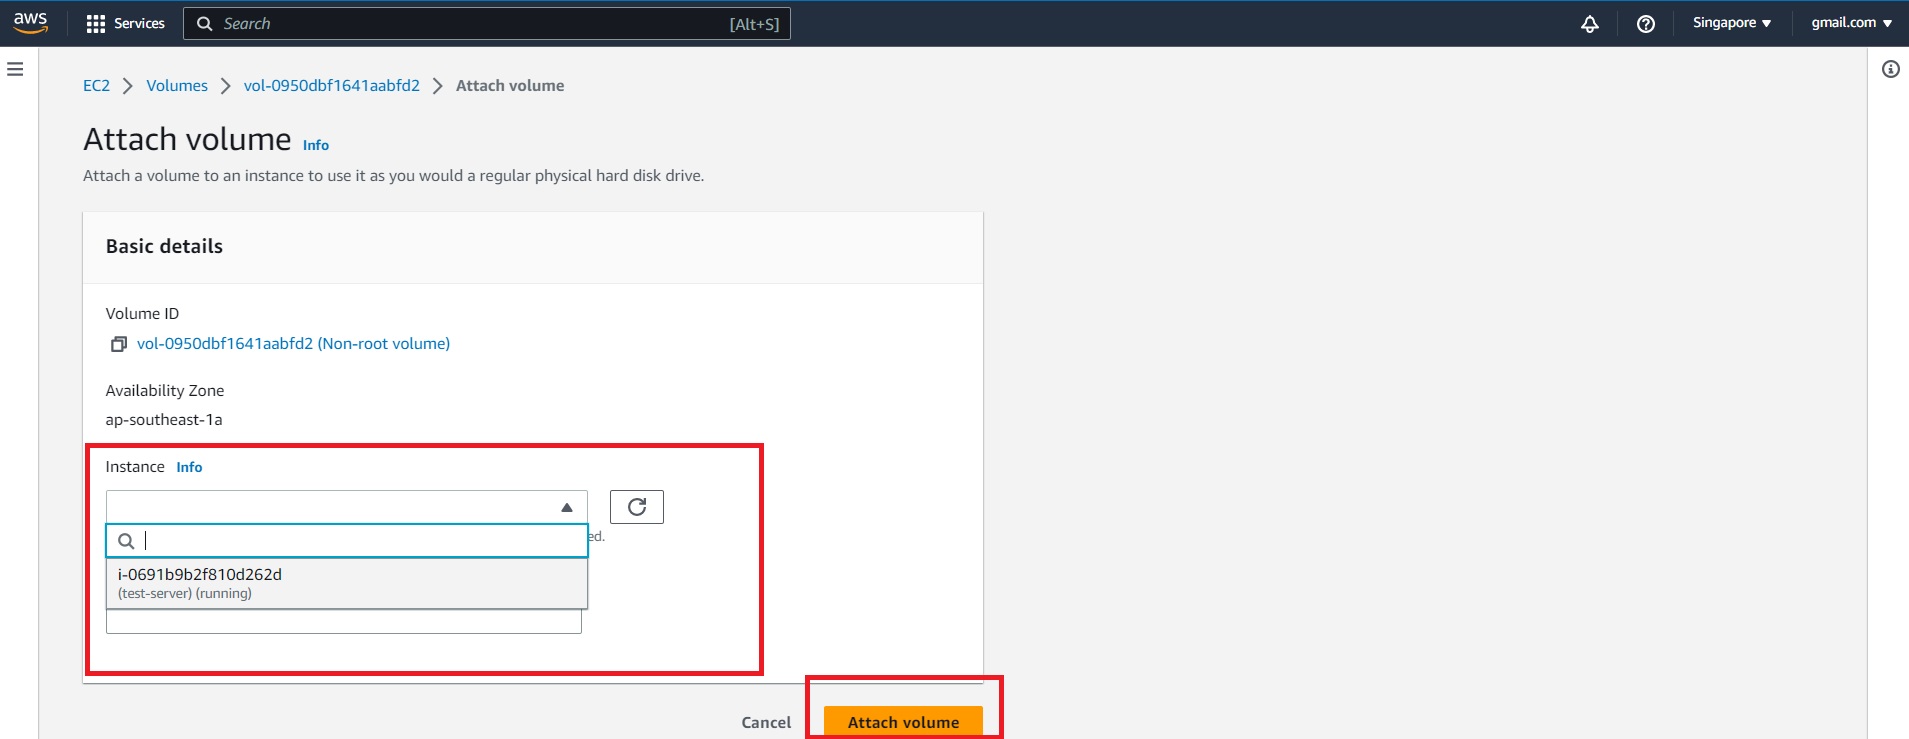
How to attach the non-root volume to the EC2 instance
Go to service.
Inside the Elastic block store click on volume.
Click on Action.
Inside Action click in Attach volume.

- Select the Instance
Verify with EC2 Instance
Click on the EC2 dashboard
Click on Instance (running)
Click on Instance
Click on Storage

Summary: - Here we successfully created the snapshot and using the snapshot we created the volume and attached the non-root volume to the EC2 instance.
If we are practicing the termination of the resource to avoid the billing
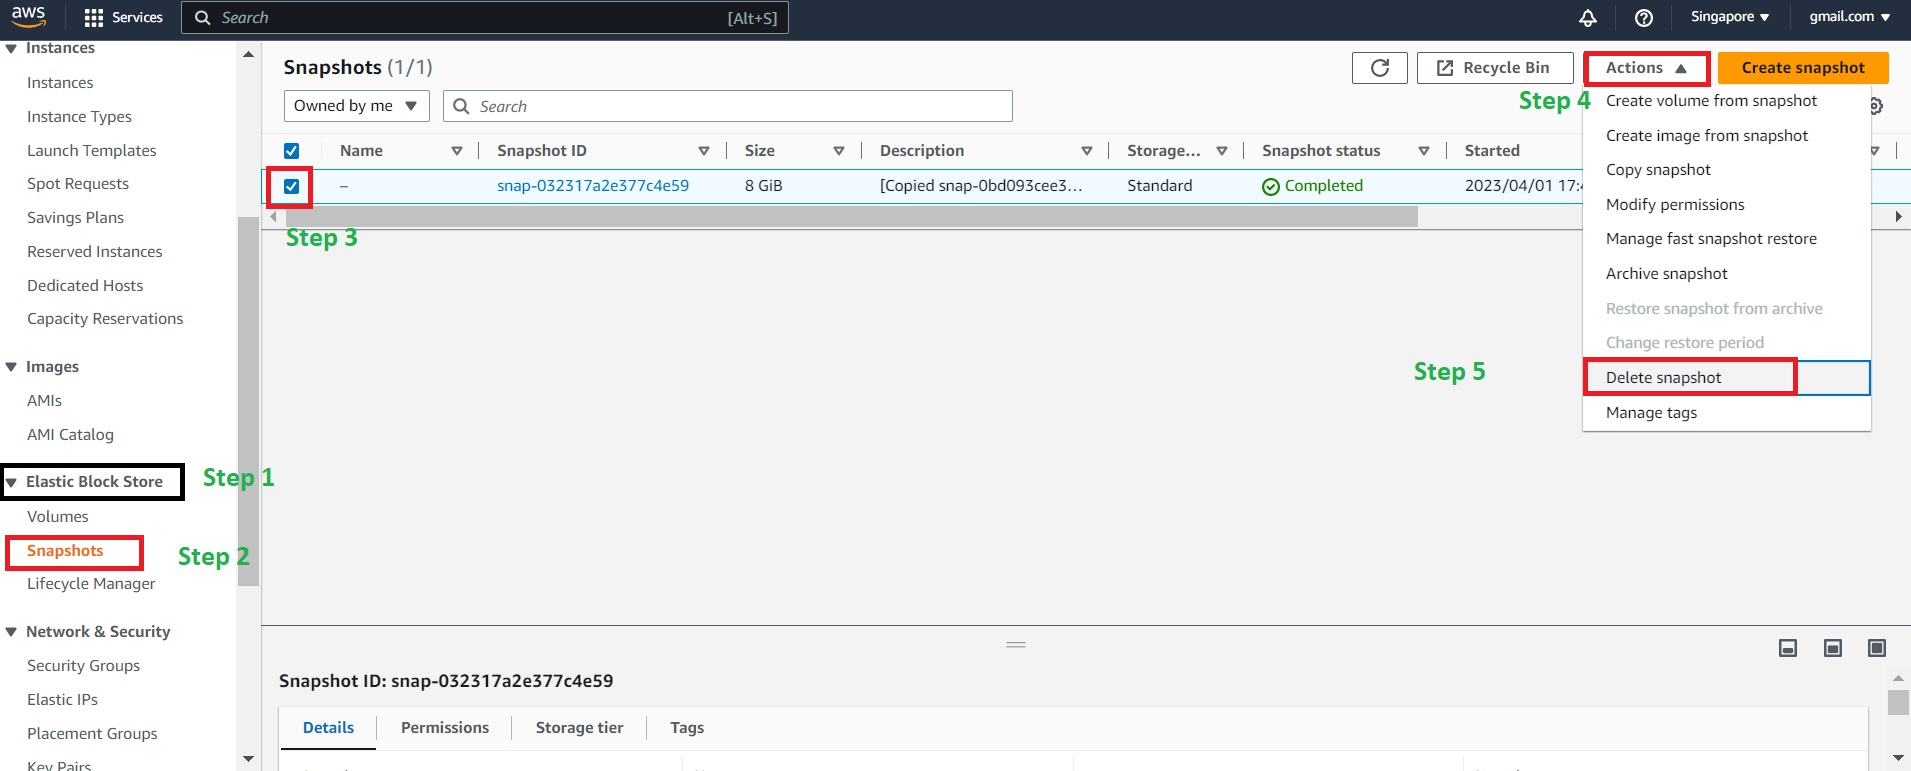
- Terminate the instance

- Delete the volume
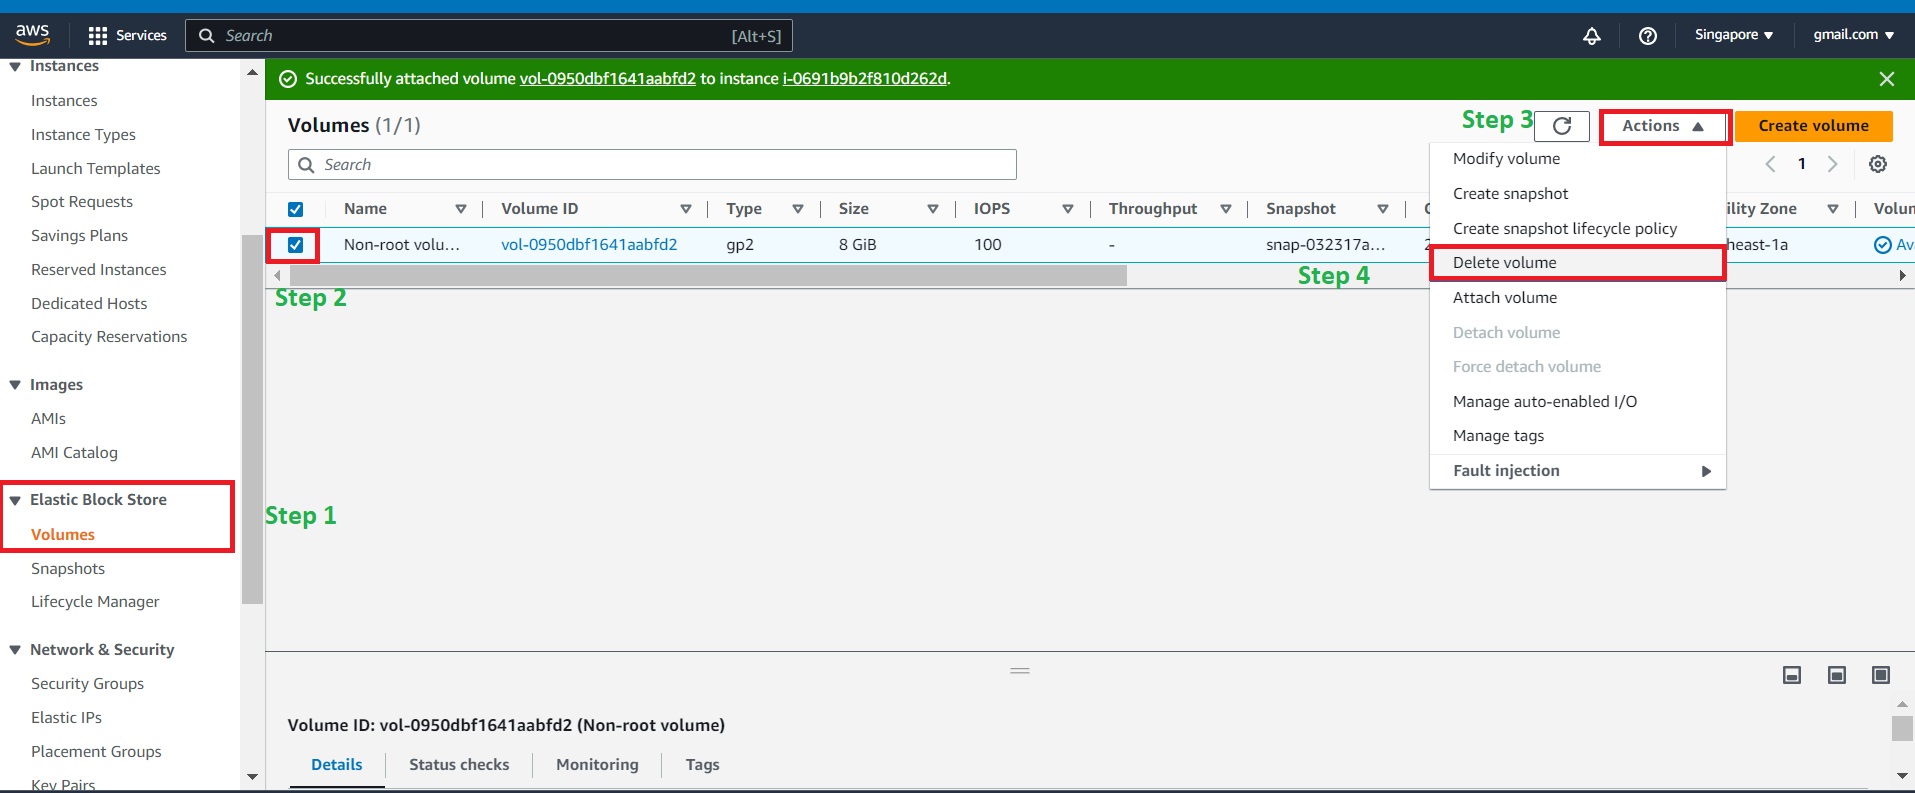
- Delete the snapshot
Thank you for reading this is a complete guide for a snapshot of the non-root volume.
If you have any questions or suggestions on my blog, please put a comment in the box.
Thank you once again!
Pawan Bhagat


